3 posts tagged with "Engineering"

Technical bolgs

View All Tags

Git Cheatsheet

· 6 min read

What is Git?

From Git’s official website:

Git is a free and open source distributed version control system designed to handle everything from small to very large projects with speed and efficiency.

About Version Control

What is version control, and why should you care? Version control is a system that records changes to a file or set of files over time so that you can recall specific versions later. Even though examples in most of the cases show software source code as the files under version control, in reality any type of file on a computer can be placed under version control.

To install Git:

sudo apt-get install git

To check version:

git -- version

For configuring:

git config -- global <keyword> “Data”

  • <keyword> can be user.name ,user.email, core.editor etc.
  • To display current saved configration type git config --list

For help:

git help <verb>

eg: git help config for help regarding configration process

Creating a local repository:

  • Simply cd into the directory you want to track and simply type git init. This will create a .git file in the directory with a basic skeleton without any commits.

To check which files can be commited:

git status

this will list the files that can be commited

  • To ignore files create a .gitignore file using touch .gitignore
  • Open this using text editor and add names of files you want to ignore

Moving files to staging area:

  • For adding files individually use –git add <filename>
  • For adding all files at once use –git add -A
  • To remove files from staging area use –git reset <filename>and to remove all simply type git reset

To commit the files:

git commit

but it is necessary to add messages with the commit to make sure what we did ; so for that we use -m extension like git commit -m “message”
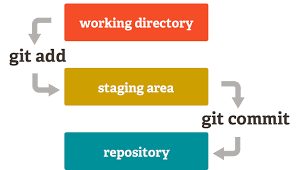
Staging and committing Flowchart.

To check the commit history:

git log

Cloning a repository from internet:

git clone <url> <location>

  • To clone into current directory use .in place of location.
  • To check status of the cloned repository use git remote -v This will give the location from where it is fetched.
  • git branch -a gives all the branches in the cloned repository.

Changing and submitting:

  • Make changes to the file of the cloned repository.Now to see change made type git diff <commit>

This will display the change made with respect to the <commit>. By default if <commit> field is left empty , Git compares it with HEAD i.e the last commit.

Another feature or form of git diff is

git diff --cached <commit>

This shows the diff between your staged changes and the <commit>. So, here it gives the diff between your index and the last commit.

git diff <commit> shows the diff between the current working tree and the <commit>.

  • Now git status will view the modified files .
  • Add the file to the staging area using git add -A.
  • Commit these files with appropriate message .
  • Now before pushing it back . We need to pull and check whether any other person made a change in the branch since the last time type in git pull origin master ( If on master branch else use branch name in place of master).

IMPORTANT NOTE:

git pull is often confused with git fetch .The basic difference is stated below.

git fetch really only downloads new data from a remote repository — but it doesn’t integrate any of this new data into your working files. Fetch is great for getting a fresh view on all the things that happened in a remote repository.
Due to it’s “harmless” nature, you can rest assured: fetch will never manipulate, destroy, or screw up anything.git fetch is also useful when we manually wish to merge or check and merge conflicts that arise whereas git pull* *directly fetches and merges (refer branching for merge). It is therefore more preferred to use git fetch.

git pull in contrast, is used with a different goal in mind: to update your current HEAD branch with the latest changes from the remote server. This means that pull not only downloads new data; it also directly integrates it into your current working copy files.

Now for finally pushing type in –>

git push origin master

Basic process Flowchart.

Branching:

A typical image which represents blue dots as master and rest as side branches.

  • To create a new branch use git branch <branchname>
  • To check all the branches present use git branch
  • To switch over branch use git checkout <branchname>
  • To push a commited changes type in git push -u origin <branchname>
  • To merge the current branch you are working on to master use git merge <branchname>
  • To push the changes we simply use git push origin master
  • To check it they are merged type in git branch --merged
  • If the branch is successfully merged we can now delete the branch–git branch -d <branchname>

To switch to a previous version of the code:

We do git reset <mode> <SOME-COMMIT>(some commit is the commit number ) then Git will:

  • Make your current branch (typically master) back to point at <SOME-COMMIT>.
  • Then it will modify your working tree and the index (“staging area”) according to the <mode> selected.
  • The mode must be one of the following (If <mode> is left blank then by default --mixed is selected) —
  • --soft —Does not touch the index file or the working tree at all (but resets the head to <SOME-COMMIT>, just like all modes do). This leaves all your changed files “Changes to be committed”, as git status would put it.
  • --mixed — Resets the index but not the working tree (i.e. the changed files are preserved but not marked for commit) and reports what has not been updated. This is the default action.
  • --hard — Resets the index and working tree. Any changes to tracked files in the working tree since <SOME-COMMIT> are discarded.

Stashing

Often there is a condition where code is in a messy state and you don’t want to work any further . Also you can’t commit this half-written code. In such conditions function called git stash is used.

  • Type in git stash this will push this code onto a stack while keeping the working directory clean.Further use of this function again and again on the same code will generate a stash stack.
  • To display the stash stack use git stash list .The list will be numbered as stash@{0},stash@{1} ….stash@{n} .
  • Finally when you decide to work again and want to apply the changes use git stash apply . To apply any older stash from the stash stack use git stash apply stash@{n} where n is the stash number.

For Reference regarding Git :

Writing Kickass READMEs

· 9 min read

Writing documentation for code is extremely important. Alas! I realized this late. Nevertheless, you should not make this mistake again.

This is written with respect to software related READMEs, if you want guidelines for other stuff, then probably this isn’t the right place.

Let’s discuss the potential problems of not having a good README:

Not a clear description of the project

I don’t recount how many times this has happened with me. I usually just scroll through all of my friends’ projects on GitHub to see what they are upto these days and time and again I have been disappointed by not seeing a good description about the project and it is too time consuming to read the whole source code to find out what that repository is actually doing.

In fact some professional projects too have vague description and you are left clueless as to what the code does. Sometimes the project is so big that they can’t really mention all of it in one thing. That is the time you should probably split it in many repositories or folders (if you desperately want a big mono repo like Google) and each folder should contain some high-level information of what the code inside it will do, just like recursive Makefiles.

Not having a installation guide (or an incomplete one)

So since you have got the viewer interested in trying our your software by writing a good introduction, you would now probably piss off her by sucking at writing an installation guide.

What a developer should understand is that since your development environment is setup to run that code, doesn’t mean everybody’s is. One should always write the whole installation process for all systems that the software supports and it should clearly mention that the software doesn’t really have support for this system but it would be great to support it in future or something.

For unix-based systems, one should list out all the ways to install the software. Let’s take an example of Ubuntu. If you have managed to get your software packaged with a .deb file and also uploaded it upstream so that it can be used with apt-get, then that’s just awesome!

Sometimes you might be releasing it and then packing the source code in a tar.gz format, still awesome. In the latter case, it would be worth while to mention all of the dependencies required. Also, just the name isn’t enough, their exact version numbers is even better because you might never know when a python code breaks because of the version bump because well that’s how things work in python world.

If you are expecting the user to do a gcc based compiling for each source code file then God just forgive you. It is time to move on to at least Makefiles to automate that process for you.

If something doesn’t work in particular systems, it is important to list it out.

No User Documentation

You don’t have a user documentation? Well then how do you expect others to use your software. User documentation should be in another file or folder (if it is quite big) and should probably be in some kind of a format which can be rendered easily. You can either write it in markdown format or in Github wiki’s so that it can be easily read on GitHub or you can write in man pages form for the oldies to read it. But you should have it. And that’s not it, your README should explicitly point out to the documentation and also tell the user how to access it and actually read it.

Also you can include the very basic use case in the README itself.

No guide for people to actually contribute

If you have the viewer till now and she is thinking of actually contributing to your project, then kudos, your project is awesome.

A very important part of the contributing guide is to setup the development environment. Again in this, it is worthwhile to get into the platform specific information. For eg. Windows will have different development environment while Ubuntu will have a different one. You should mention what IDE you used or the tools that you used.

Now your project might have some development related dependencies. You should mention about that too. Now finally the viewer can have successful environment setup to actually contribute to your code.

Now, you might be following some conventions for writing your code, right? It is worth while to mention the conventions that you have followed in a separate file and link it in the README.

Then you would have a specific way or two in which you accept others’ code, right? You might be using Github’s Pull Request based system or the age old sending patches via email using git-format-patch and git-send-email just like old times. Whichever you prefer, it is important to specify this in a new file possibly named as CONTRIBUTING GUIDELINES or something. If you have any specifics about the project mention it there. Don’t just expect people to know it by default.

It is also worth while to link the easy to fix bugs for new comers so that they can get familiar with the code base without trying to mingle with the core parts of the software.

No technical documentation

If you are having a big project, then you might be having a “core” part which is used by other parts of code. Have you documented it? Or you just expect people to git-grep and git-blame to find the relevant use cases, definition of the functions and the documentation inside the commit messages? If you are doing that, it is not exactly bad (I understand you might be having your own reasons) but it is good to write a technical documentation wherein you will tell the programmer what a method does and how to use it. This will also make sure she doesn’t write a method to do the same stuff again and thus it would reduce your redundancy.

No mention of how to run tests

Of course you project has tests, otherwise how can you make sure that by writing new code, you don’t break the old code? Your README should contain how to run the test suite. There are tons of different test suites available in the market and it is time consuming for people to check out your test framework and make guesses as how one could probably run it. You should mention how to run individual tests, the whole test suite, and how to skip some tests, and if your test suite framework doesn’t support all of these features, then maybe the one you are using should be replaced.

No license

Yes, legal matters are important too! Whether you are releasing it as an truly open-sourced software with BSD license or something else, you should mention it. If you don’t realize the importance of licensing, that is maybe because your project isn’t big enough. Once a lot of people read your code, use it, they might try to finger with it whether you like it or not. You should explicitly specify “how much fingering” you can tolerate in a separate file named as LICENCE in full detail like a legal document and if you are using a popular license, you can just mention the name in the README.

No place to mention about bugs

You don’t have a bug management system? Okay, I agree this isn’t really always required but if you do, you should explicitly mention and link to that. If you talk about bugs in GitHub issues, then mention it there. Also if you are using GitHub, use labels to specify the bugs. If you still track bugs using emails via mailing list, specify that too also include a link to the old archives of the mailing list.

No mention about the version control system

Well if you are seeing the project on Github, is it wrong to assume that it uses git? Yes, there are many projects that I know use multiple version control systems and the best example is nmap. They accept patches (and PRs) in all forms and integrate it together. So explicitly mention about all the version control systems that you would be using and how you would accept foreign code for each.

No contacts

How should the viewer contact you in case he needs something or has something for you? Probably now you have a good incentive to give out your contact information (mainly email is good) for others to contact you or just say “Thanks for the awesome software!”.

No fancy GUI pictures

You probably would have spent a hell lot of time in designing and tweaking the GUI and were frustrated when a font size looks bigger than it should, so you should show it off. There are lots of people who like the fancy GUI way of software rather than the good old black terminal with green text. If you have a fancy GUI, try and put the pictures of it in the README. GitHub’s markdown renders it, but I don’t think man pages do. But if you really care about man pages, you probably won’t even have cared enough to make a fancy GUI.

No table of contents

Well if you try to write everything that I have pointed out, then it is probably good for you to follow this advice too. Have a Table of Contents. This way, the README will look more organized and it would make reading much easier.

Okay, now that I have ranted a lot, I hope you know How to Write KickAss READMEs.


This article originally appeared in Pranit Bauva’s website.

Breaking Github Down

· 3 min read

During my mid semester exams, one night I was getting bored so I decided to check how to break the most used code hosting website GitHub. I wrote a script[1] to add infinite commits to a repository named “Commiter”[2]. It added a dot at the end of a text file after every commit. The script pushed to the master branch after every 10,000 commits and then after 1,00,000 commits it deleted the repository and then cloned it back with just the last commit. I had to do it because after a large number of commits the directory size was quite large(approx 7–9 GBs).

With the help of this script I was able to find three bugs on GitHub after which they blocked my repository[2] .

  1. Z-index for commit label of contribution graph was not proper :

Below is the screenshot of the issue I am talking about.

Issue #1

The label for the commit number should be above the graph. I got the following response for this issue.

Reply for issue #3

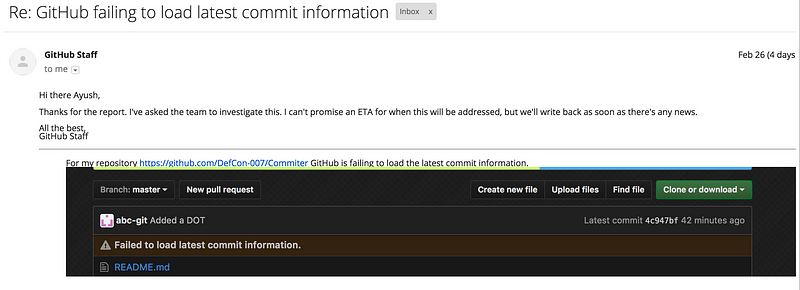
2. Latest commit info was not loading :

After some days the I noticed that the GitHub was failing to load the latest commit information on the repository homepage.

Issue #2

And for this issue I got the following reply.

Reply for issue #2

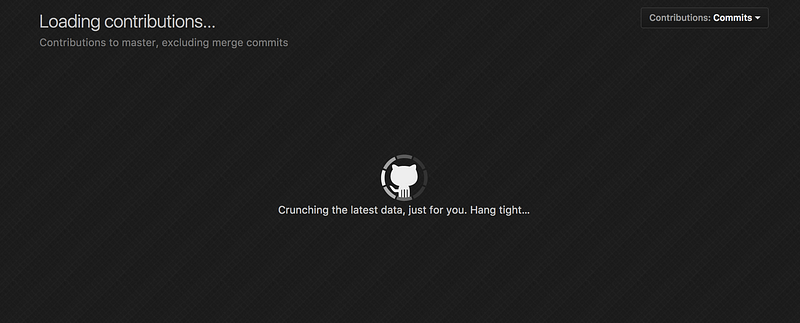
3. Contributions graph failing to load :

According to me this was a major bug. The contributions graph stopped loading. It showed the below screen for hours and then the page said “Failed to load contributions graph”.

Issue #3

Sadly this was the last issue I was able to track. After reporting this people at GitHub disabled access to my repository. The reason stated by them was :

The repository you’re inquiring about, DefCon-007/Commiter, has been deemed abusive to our system and we have disabled it.

Large numbers of commits do not lend themselves well to versioning with Git and performance issues with a repository of this size can endanger the availability of your repo as well as other user’s repositories. Additionally, the pattern of your commits is very different than that which Git was meant to handle, and therefore consumes far more resources than a normal Git repository of its size.

And at the end they clearly mentioned that the repository access will not enabled again.

P.S. : I was able to reach around 6,567,567 commits.

So this was my story how I used my mid semester exam frustration to do some mischief with GitHub.

References :

[1] https://github.com/DefCon-007/Commiter-source

[2]https://github.com/DefCon-007/Commiter