Git Cheatsheet

What is Git?

From Git’s official website:
Git is a free and open source distributed version control system designed to handle everything from small to very large projects with speed and efficiency.
About Version Control
What is version control, and why should you care? Version control is a system that records changes to a file or set of files over time so that you can recall specific versions later. Even though examples in most of the cases show software source code as the files under version control, in reality any type of file on a computer can be placed under version control.
To install Git:
sudo apt-get install git
To check version:
git -- version
For configuring:
git config -- global <keyword> “Data”
<keyword>can beuser.name,user.email,core.editoretc.- To display current saved configration type
git config --list
For help:
git help <verb>
eg: git help config for help regarding configration process
Creating a local repository:
- Simply cd into the directory you want to track and simply type
git init. This will create a .git file in the directory with a basic skeleton without any commits.
To check which files can be commited:
git status
this will list the files that can be commited
- To ignore files create a .gitignore file using
touch .gitignore - Open this using text editor and add names of files you want to ignore
Moving files to staging area:
- For adding files individually use –
git add <filename> - For adding all files at once use –
git add -A - To remove files from staging area use –
git reset <filename>and to remove all simply typegit reset
To commit the files:
git commit
but it is necessary to add messages with the commit to make sure what we did ;
so for that we use -m extension like git commit -m “message”
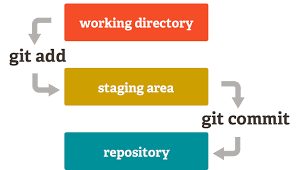 Staging and committing Flowchart.
To check the commit history:
git log
Cloning a repository from internet:
git clone <url> <location>
- To clone into current directory use
.in place of location. - To check status of the cloned repository use
git remote -vThis will give the location from where it is fetched. git branch -agives all the branches in the cloned repository.
Changing and submitting:
- Make changes to the file of the cloned repository.Now to see change made type
git diff <commit>
This will display the change made with respect to the <commit>. By default if
<commit> field is left empty , Git compares it with HEAD i.e the last
commit.
Another feature or form of git diff is
git diff --cached <commit>
This shows the diff between your staged changes and the
<commit>. So, here it gives the diff between your index and the last commit.
git diff <commit>shows the diff between the current working tree and the<commit>.
- Now
git statuswill view the modified files . - Add the file to the staging area using
git add -A. - Commit these files with appropriate message .
- Now before pushing it back . We need to pull and check whether any other person
made a change in the branch since the last time type in
git pull origin master( If on master branch else use branch name in place of master).
IMPORTANT NOTE:
git pullis often confused withgit fetch.The basic difference is stated below.
git fetchreally only downloads new data from a remote repository — but it doesn’t integrate any of this new data into your working files. Fetch is great for getting a fresh view on all the things that happened in a remote repository.
Due to it’s “harmless” nature, you can rest assured: fetch will never manipulate, destroy, or screw up anything.git fetchis also useful when we manually wish to merge or check and merge conflicts that arise whereasgit pull* *directly fetches and merges (refer branching for merge). It is therefore more preferred to usegit fetch.
git pullin contrast, is used with a different goal in mind: to update your current HEAD branch with the latest changes from the remote server. This means that pull not only downloads new data; it also directly integrates it into your current working copy files.
Now for finally pushing type in –>
git push origin master
 Basic process Flowchart.
Branching:
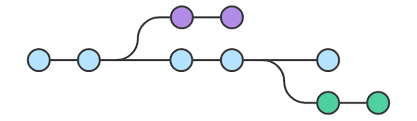 A typical image which represents blue dots as master and rest as side branches.
- To create a new branch use
git branch <branchname> - To check all the branches present use
git branch - To switch over branch use
git checkout <branchname> - To push a commited changes type in
git push -u origin <branchname> - To merge the current branch you are working on to master use
git merge <branchname> - To push the changes we simply use
git push origin master - To check it they are merged type in
git branch --merged - If the branch is successfully merged we can now delete the branch–
git branch -d <branchname>
To switch to a previous version of the code:
We do git reset <mode> <SOME-COMMIT>(some commit is the commit number ) then
Git will:
- Make your current branch (typically
master) back to point at<SOME-COMMIT>. - Then it will modify your working tree and the index (“staging area”) according
to the
<mode>selected. - The mode must be one of the following (If
<mode>is left blank then by default--mixedis selected) — --soft—Does not touch the index file or the working tree at all (but resets the head to<SOME-COMMIT>, just like all modes do). This leaves all your changed files “Changes to be committed”, as git status would put it.--mixed— Resets the index but not the working tree (i.e. the changed files are preserved but not marked for commit) and reports what has not been updated. This is the default action.--hard— Resets the index and working tree. Any changes to tracked files in the working tree since<SOME-COMMIT>are discarded.
Stashing
Often there is a condition where code is in a messy state and you don’t want to
work any further . Also you can’t commit this half-written code. In such
conditions function called git stash is used.
- Type in
git stashthis will push this code onto a stack while keeping the working directory clean.Further use of this function again and again on the same code will generate a stash stack. - To display the stash stack use
git stash list.The list will be numbered asstash@{0},stash@{1}….stash@{n}. - Finally when you decide to work again and want to apply the changes use
git stash apply. To apply any older stash from the stash stack usegit stash apply stash@{n}where n is the stash number.
For Reference regarding Git :
- For practicing and learning git checkout — https://github.com/kossiitkgp/git-sandbox
- Basic git :https://www.youtube.com/watch?v=HVsySz-h9r4&t=464s
- Resolving a pull request: https://help.github.com/articles/resolving-a-merge-conflict-using-the-command-line/